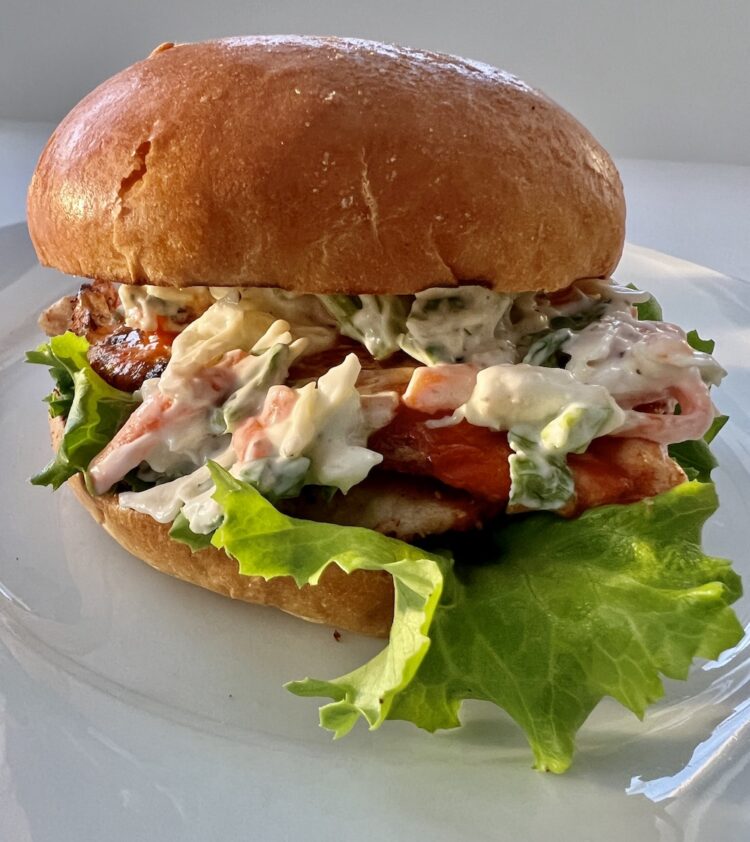
Skip to content

Fish Tacos with Chipotle and Avocado Cream

May 2, 2013


DSC_0630Honestly, I’m using Cinco de Mayo as an excuse to plate up some spicy fish tacos. This is a healthy entree for your weekday fare using pan-fried fish and a yogurt based sauce. The marinade gives the fish a spicy, smokey flavor but you are quickly cooled down with the tangy avocado sauce. Who needs a holiday for this easy, festive dinner? If you plan on having a fiesta you might want to add a few of these sides to your menu planning. Beans and yellow rice, grilled Mexican corn, guacamole/chips, Mexican chocolate cupcakes……oh, and of course Lime Margaritas and ice-cold Coronas!

Spicy Fish Tacos with Avocado-Yogurt Sauce   Adapted from Crumb Blog/ Isabelle Boucher
Serves 2-3 (6 tacos)
Fish
2 tbsp fresh lime juice
2 tbsp extra-virgin olive oil
2 tsp chipotle powder (or chili powder, if you prefer)
1 tsp ground cumin
1 tsp sweet paprika
½ tsp salt
1 lb fresh haddock, halibut, mahi-mahi (or any other firm white fish)
Avocado-Yogurt Sauce
1 large ripe avocado, pitted and roughly chopped
¼ cup plain yogurt
1 tbsp fresh lime juice, or more to taste
½ cup roughly chopped cilantro
¼ tsp salt
¼ cup water
Garnishes:
6 (12 if you double) small corn tortillas
Shredded cabbage
Pickeled red onions (see recipe below)
Cilantro sprigs
Finely julienned radishes
Lime wedges
 In a small bowl, combine the lime juice, olive oil, chipotle powder, cumin, paprika and salt, and stir until smooth. Pat the fish dry with paper towels. Rub on both sides with the lime-chipotle marinade. Transfer to a plate and cover tightly with plastic wrap, refrigerate for 15-20 minutes.
 Avocado-Yogurt Sauce: While the fish marinates, prepare the avocado-yogurt sauce. In the bowl of a food processor, combine the avocado, yogurt, lime juice, cilantro, salt and water, and process until smooth and creamy. Transfer to a serving bowl and cover tightly with plastic wrap. Refrigerate until ready to use.
In a large heavy-bottomed skillet set over medium-high heat, saute the fish in the remaining 2 tbsp olive oil until opaque and flaky, about 4-5 minutes per side. Remove from heat, and transfer to a platter. Using a fork, break up each filet into bite-sized chunks. Cover with foil, and set aside while you warm the tortillas.
Assemble the Tacos: In a heavy-bottomed skillet set over medium heat, warm the tortillas one at a time for 20-30 seconds per side, or until soft and flexible. To assemble, place a few tortillas on each plate and drizzle with avocado-yogurt sauce. Divide the fish evenly between the tortillas, then add additional toppings and serve.

Mexican-Style Pickled Onions    Adapted from Epicurious

1 small red onion, thinly sliced
1 cup cider vinegar
1 tsp salt
1 clove garlic
1 tsp oregano

Blanch the onion slices in a large saucepan full of boiling water for 1 minute, then drain.
Return the onions to the pan, along with cider vinegar, salt and add as much cold water as needed to barely cover. Bring to a simmer and cook for 1 minute.
Pour onions and brine into a container. Smash the garlic clove, and add to the container along with the oregano. Chill in the refrigerator for at least a couple of hours before serving.
Pickled onions will keep for several weeks in the refrigerator –  they make a great condiment and can also be used on your favorite sandwich or with chicken.

DSC_0436

DSC_0566

DSC_0595


Tuna Tartare with Avocado and Cilantro

April 28, 2013


DSC_0346
Crisp, clean, fresh, bright flavors are what I taste with this tuna dish. The combination of tuna and avocado creates a rich, buttery texture. Add the nuttiness of sesame oil, savory notes with soy, a bit of bite with onion and jalapeno and finish with a fresh squeeze of lime, and you have a terrific appetizer or main course. Randy suggests pairing with a Sauvignon Blanc.
Tuna Tartare with Avocado and Cilantro
Serves 4-6
2 tablespoons soy sauce
1 teaspoon soy sauce
1 teaspoon rice vinegar
Zest of 1 lime
Juice of 1 lime
1 tablespoon sesame oil
3/4 OR 1 pound Ahi Tuna, cut into 1/4 ” cubes
1 large avocado, cubed
4 green onions, sliced
1 jalapeno, seeded, diced
1/3 cup cilantro, chopped
1 tablespoon sesame seeds, toasted
Salt and pepper, to taste
Whisk first 5 ingredients in medium bowl to blend. Add tuna, onion and jalapeno. Stir to coat. Spoon tartare in to a bowl, sprinkle with sesame seeds. Just before serving, fold in avocado and garnish with  cilantro. Serve in glasses (serves 4). OR serve on a platter with homemade tortilla chips (serves 6).

DSC_0279

DSC_0282

DSC_0330

Rosemary Parmesan Popcorn

April 27, 2013

DSC_0204

Need a new twist for an old snack idea? Popcorn… healthy popcorn. Who doesn’t love these crunchy, puffed, pieces of goodness? Skip the butter bath and try these ingredients for an outrageous combination of flavors…which are always on hand in my home. Pair these earthy, herbal little kernels with a crisp white wine. Happy… Happy Hour!

Oh, did I mention how healthy this snack is??!! Popcorn: (Air popped), 31 calories per cup, whole grain, fiber, low-fat, heart smart, full of healthy nutrients. Rosemary: phyto-nutrients, anti-oxidants and essential acids. Olive oil: healthy fat, anti-oxidants, Vitamins E and K, Omega 3-6 fatty acids, Lemon Peel: Vitamins C, minerals. Black Pepper: “King of Spice”- Good amount of minerals, Vitamins C, A. Parmesan: even though the cheese is high in fat (this recipe only calls for 1 T), it’s an excellent source of protein, calcium and provides almost all of the essential vitamins and minerals. Salt: Well, we need to limit our intake.  SIGN ME UP!!!!!!

Rosemary Parmesan Popcorn   (adapted from Taste, Love and Nourish Blog)

1/2 cup popcorn kernels

1 paper lunch bag

2 tablespoons extra virgin olive oil

2 teaspoons rosemary leaves, finely chopped

1/2 teaspoon sea salt or to taste

Cracked pepper, to taste

1 tablespoon Parmesan, freshly grated

Zest of 1 lemon

In a paper lunch bag, add 1/2 C. popcorn kernels and fold the top of the bag a couple of times. Place in your microwave and cook on high for about 2 minutes and 30-40 seconds. Keep a watchful ear as to not burn the popcorn. While the popcorn is popping, combine the olive oil, rosemary, sea salt and pepper in a small bowl. Place popcorn in serving bowl, drizzle with the olive oil mixture, then grate the Parmesan and the lemon zest over top and mix.

DSC_0219

DSC_0267


Banana Cream Pie Shooters

April 21, 2013
The instructions were…bring a sweet for the sweet table. I knew the table would be filled with cakes, pies and all things chocolate. I wanted to do something a little different. Knowing that Tom (the birthday boy) loved banana cream pie, this deconstructed version was a no-brainer.  The recipe below was developed by Christina Tosi, owner/chef of Momofuku Milk Bar. Enough said. Tosi’s version of this rich, velvety, decadent dessert is a perfect finish to any meal.
Banana Cream Pie Shooters     (Adapted from Momofuku Milk Bar by Christina Tosi)
Chocolate Crumb

2/3 cup all-purpose flour
1 teaspoon cornstarch
1/2 cup sugar
2/3 cup good-quality cocoa powder
1 teaspoon salt
6 tablespoons unsalted butter, melted

Heat the oven to 300 degrees.
Combine the flour, cornstarch, sugar, cocoa, and salt in the bowl of a stand mixer fitted with a paddle attachment. Mix on low until mixed. Add the butter and mix on low until the mixture starts to come together in small clusters. Spread the crumbs on a parchment covered sheet pan. Bake for 20 minutes. Let the crumbs cool completely before using.

**The following instruction for Chocolate Crust is NOT used for the shooters. Use the crust recipe if you are making a pie.

**Chocolate Crust       (makes 1 10-inch pie crust)
3/4 of the chocolate crumb recipe above
2 teaspoons sugar
1/8 teaspoon salt
1 to 2 tablespoons of melted butter

Break up the chocolate crumbs into a bowl. Add sugar and 1 tablespoon of the melted butter to start. With your hands, knead until it is moist enough to form a ball. If it isn’t moist enough, add another tablespoon of melted butter. Press the crust firmly into the pie plate, making sure the bottom and sides are evenly covered.

Banana Cream
very ripe bananas

1/3 cup heavy cream

1/4 cup whole milk

1/2 cup sugar

2 tablespoons cornstarch

1/2 teaspoon salt

3 egg yolks

2 gelatin sheets (or 1 teaspoon powdered gelatin)

3 tablespoons butter

1/2 teaspoon yellow food coloring (I did not use food coloring….looks lovely without)

3/4 cup heavy cream (plus more for topping, about 1 cup)

1 cup powdered sugar (I used 3/4 cup)

1 just-ripe (yellow) banana, diced

Additional Whipped cream for topping/slightly sweetened with powdered sugar

Combine the ripe bananas, 1/3 cup heavy cream, and 1/4 cup milk in a blender & puree until totally smooth. Add the next section of ingredients–the sugar, cornstarch, salt, & egg yolks and blend. Pour into a medium saucepan. Clean out the blender. Bloom the gelatin. (To bloom sheet gelatin, soak it in a small bowl of cold water for 2 minutes. Gently squeeze to remove any excess water before using. To bloom powdered gelatin, sprinkle it evenly onto the surface of 2 tablespoons of cold water in a small dish or cup. Allow to soften for 3-5 minutes.)

Whisk the contents of the pan and heat over medium-low heat. As the banana mixture heats up, it will thicken. Bring to a boil and then continue to whisk vigorously for 2 minutes to fully cook out the starch. The mixture will resemble thick glue, bordering on cement, with a color to match. Dump the contents of the pan into the blender. Add the bloomed gelatin and butter and blend until smooth and even. Transfer the mixture to a container & chill in refrigerator for 30-60 minutes or until completely cooled.

Using a whisk or a mixer with a whisk attachment, whip the cream and powdered sugar to medium-soft peaks. Add the cold banana mixture to the whipped cream and slowly whisk til combined. (Stored in the refrigerator in an airtight container, this will stay fresh for up to 5 days.)

To Assemble Shooters: Use a pastry bag. Start with a dollop of banana cream/ diced bananas/banana cream/chocolate crumb. Repeat as many times as your vessel allows. End with whipped cream. Toppings: toasted coconut or chocolate crumb.

Note: I assembled the shooters 4 hours before I left for the party. Make sure you place the diced bananas in between the creme layers so not to brown. Keep in fridge until you serve them.

To Assemble Pie: Pour half the banana cream into the chocolate pie shell. Cover with a layer of sliced banana and then cover that with the remaining filling.

DSC_0014
DSC_0020
DSC_0021
DSC_0026
DSC_0025
                       Shot, wine, martini, brandy, ……………any glass will make a nice presentation!
DSC_0050

Strawberry Spinach Salad

April 18, 2013


DSC_1059

Celebrate the season with strawberries and spinach. This salad may have had its hay-day in the 80′s…but really, it’s timeless. We all need this recipe for our go-to pot luck dinners. Perfect accompaniment with grilled chicken or pork. I’m  pairing this with quinoa for a vegetarian/gluten-free option.

DSC_1056

Strawberry Spinach Salad

Serves 4

2 tablespoons sesame seeds

1 tablespoon poppy seeds

1 tablespoon sugar

1/2 cup olive oil

1/4 cup balsamic vinegar

1/4 teaspoon paprika

1/4 teaspoon Worcestershire sauce

1 tablespoon red onion, minced

10 ounces baby spinach, rinsed

1 quart of strawberries, rinsed, hulled, sliced

1/4 cup slivered almonds, toasted

Blue cheese or goat cheese crumbled (optional)

Blackberries (optional)

In a medium bowl, whisk together the sesame seeds, poppy seeds, sugar, olive oil, vinegar, paprika, Worcestershire sauce and onions. (This dressing is the star of the recipe!) Cover, and chill for one hour. In a large bowl, combine the spinach, strawberries and almonds. Pour dressing over salad, and toss. Serve immediately. This salad tends to wilt quickly.

DSC_1073


Pan Roasted Halibut On Asparagus Ribbons

April 13, 2013

DSC_0976

Halibut is a fairly dense fish with a firm texture which allows it to stand up to heat well. This is an ideal fish for pan roasting. Good fish tastes best with minimum fuss. How about a 10 minute entrée using 6 ingredients and 1 pan?!! Randy (a.k.a. my dishwasher) just fainted!!!!

Halibut

Serves 2

2 halibut fillets

Kosher salt/ pepper

Canola oil

Olive oil

Garnish, lemon and fennel fronds

Let fish stand at room temperature for 10 minutes. Season both sides of fish with salt and pepper. Add some canola oil to a non stick  pan and heat over high heat until sizzles. Add halibut to pan, lower the heat to medium and cook for about 6-8 minutes, until the bottom is golden. Lower the heat and cook for 2 minutes. Flip the fish and cook for 1 minute or until cooked through. Drizzle with olive oil.

DSC_0955

DSC_0962

DSC_0966

DSC_0990

Asparagus Ribbons 

Serves 2

6 asparagus spears, trimmed

1/4 bulb of fennel, fronds for garnish

1/2 tablespoons extra virgin olive oil

1 tablespoon fresh lemon juice

Sea salt and freshly ground black, to taste

1/3 cup micro-greens, optional

Shave asparagus into long thin strands using a vegetable peeler or mandolin. Thinly slice the fennel with a mandolin. Soak the strands of asparagus and fennel in a large bowl of ice water for one hour. Drain well and dry with paper towels. To make the dressing combine olive oil, lemon juice, salt and pepper to taste in a small bowl. Whisk until blended. Immediately before serving, pour the dressing over the asparagus/fennel and toss well. Arrange on plate and top with halibut.

Oven Braised Artichokes With Lemon And Thyme

April 4, 2013

DSC_0844

Don’t let the preparation of these prickly thistles intimidate you.  Artichokes are in season and this method of  braising is easy. Once you trim the leaves and cut out the choke your work is done. My Mom’s typical preparation for artichokes was to steam them. (Always somewhat problematic because of the size of the artichokes, the size of the steamer and the size of our family!) This braising technique solves that problem. Braising the artichokes in water, wine and lemon, they become succulent, soft and tender in just 30 minutes! I love keeping the leaves on the artichoke. It’s a messy, earthy way to enjoy it all as you scrape off the inner-portions of the leaves with your teeth….then work your way to the best part, the tender heart!  I paired  these delicacies with garlic aioli.

Artichokes with Lemon and Thyme

Serves 3-4

3 lemons

Zest of 1 lemon

1 cup white wine or more

Water

A few sprigs of fresh thyme

2 bay leaves

3 small garlic cloves, chopped

1 teaspoon salt

½ teaspoon pepper

3 large artichokes

Preheat the oven to 400°F. Rinse each artichoke and trim 1/2 inch off stem and 1 inch off top. Trim each leaf tip with kitchen shears. Cut each artichoke in half  from stem to top. Remove the fuzzy choke with a spoon. Squeeze the juice of one lemon over the flat side of all the artichokes to prevent browning. In a large roasting pan combine, zest of one lemon,  juice of 2 lemons (then add lemons to the pan), 3 cloves garlic, 2 bay leaves, a few sprigs of thyme, salt, pepper, 1 cup white wine, and water (add enough water to cover the artichokes half way up their sides. Cover the pan with a lid or aluminum foil and cook until the hearts are tender when pierced with a knife, 30 to 40 minutes. Remove the pan from the oven, uncover, and let the artichokes cool in the braising liquid. At this point light the grill on high. Lay artichokes flat side down on the grill for just a few minutes. Grilling creates a nice smokey finish. (This step can be omitted.) Garnish with chopped parsley. You can serve warm, or refrigerate and serve chilled.

Garlic Aioli

Makes 2/3 cup

2 garlic cloves,  pressed

1/4 teaspoon salt

1/2 cup mayonnaise

2 tablespoons olive oil

1 tablespoon lemon juice

Mash garlic and salt in a small bowl til it forms a paste. Whisk in mayonnaise, olive oil, and lemon juice. Season with salt and pepper. Can be made one day ahead.

DSC_0803

DSC_0810

DSC_0816

DSC_0857


Grilled Lamb Chops With Mint Pesto

March 30, 2013

DSC_0924
Spring. Renewal. Lamb. We have cracked the 50 degree mark and the sun is shinning!! With the return of the farmers market, and warmer days… we are back grilling! Lamb is a perfect meat for the season and is a classic pairing with mint. I would complete the meal with grilled polenta rounds and fresh spring peas.

Grilled Lamb Chops with Mint Pesto    

Serves 2

2 cups fresh mint leaves
3/4 cup fresh basil leaves
1/2 cup walnuts
2 tablespoons Parmesan, freshly grated
2 tablespoons fresh lemon juice
2 garlic cloves
1/2 teaspoon salt
1/2 teaspoon freshly ground black pepper
1/3 cup plus 2 tablespoons extra-virgin olive oil
1 1/2 pounds lamb

Blend the mint, basil, nuts, cheese, lemon juice, garlic, salt and pepper in a food processor until the herbs are finely chopped. With the machine running, gradually pour in 1/3 cup of oil until the mixture is smooth and creamy. You will have extra pesto to freeze!

Heat grill. Brush olive oil on both sides of  lamb chops. Salt and pepper. Grill 4-5 minutes per side for medium rare. Serve pesto with grilled lamb chops.

DSC_0892

DSC_0733


Pea and Mint Salad

March 27, 2013


DSC_0829

I’m a pea convert. Going back to my childhood and recalling the mushy, tasteless little guys had me avoiding them for years. Now, I look forward to peas in their season. Peas are the crowning glory of the spring season with a naturally sweet flavor which enhance and complement many dishes. When it comes to spring peas, the simplest presentations are always the best. The recipe below pulls together quickly and uses fresh and flavorful ingredients.

Pea and Mint Salad      (lightly adapted from Food and Wine)

1 lb fresh green peas (or frozen)

1 1/2 tbsp olive oil

3 medium spring onions, finely chopped

2 tablespoons butter, unsalted

Zest from 1 lemon

1 1/2 cups pea shoots or watercress

1/2 cup chopped fresh mint leaves

Salt and pepper

Lemon juice, to taste

Fill a medium-large pot with salted water and bring to a boil. Add peas. Cook til peas are tender but still firm, about 3 minutes. Drain. Heat olive oil in the same pan. Add onions, salt, cover and cook over low heat, until softened. Stir in peas, cook through til warm about 1 minute. Stir in butter, 1 tablespoon at a time. Remove from heat and stir in peas shoots, mint, lemon zest, salt and pepper. Drizzle fresh lemon juice over peas and serve.

DSC_0688


Gorgonzola Cheese Straws

March 24, 2013

DSC_0666

 This is the week that spring arrives. Tell that to the weather Gods. I however,  have made the culinary switch…..welcome to spring fare. Fresh, healthy and green….with an occasional twist. To accompany the many salads and side dishes try these easy to make cheese straws. Savory, rich with a bit of a peppery note. Great idea for a simple appetizer and a perfect companion for red wine.

Gorgonzola Cheese Straws   (Adapted from Love and Olive Oil)

Makes  24 straws

4 ounces Gorgonzola cheese, crumbled
1 cup all-purpose flour
6 tablespoons unsalted butter
1/2 teaspoon baking powder
1/2 teaspoon salt
1/4 teaspoon pepper, fresh ground
2 tablespoons milk

Preheat oven to 350 degrees. Combine cheese, flour, butter, baking powder, salt, and pepper in a food processor pulsing until mixture resembles coarse meal. Add milk and pulse until incorporated. Dough will be crumbly, but should stick together when pinched with your fingers. Roll out dough on a lightly floured surface into a rectangle, approximately 1/4-inch thick. Cut dough with a pizza wheel or sharp knife into 1/2-inch strips. Carefully transfer to two parchment lined baking sheets, leaving a  bit of space between them. You can also gently twist the strips for a slightly different effect. Bake, rotating the baking sheets halfway through baking, until straws are puffed and bottoms are golden, about 15 to 18 minutes. Cool completely. Straws will keep, stored in an airtight container, for up to 3 days.

DSC_0595
DSC_0602

DSC_0675